In this article I use "Amazon" to refer to Amazon.com Business as opposed to Amazon Web Services (AWS).
Most of the documentation available for using Google Workspace (formerly GSuite) as an single sign-on (SSO) identity provider (IdP) for Amazon pertains to AWS, not Amazon.com Business. We started looking at single-sign-on for Amazon in order to automatically create new purchasing accounts for employees. I have set up SSO for many cloud platforms using Google as the IdP and all have been straightforward until now. While Amazon does have documentation for setting up SSO, it is not specific to any identity provider, let alone Google Workspace. As I learned, there are a few configuration options that are either not specified or are wrong in the Amazon documentation. I have therefore written this tutorial to help others setup SSO for Amazon.com Business using Google Workspace as an IdP.
A big thanks to the support teams at Google (thanks David!) and Amazon for their patience and persistance in getting this integration to work.
Tutorial
Start in Google Workspace
- Once signed into Google Workspace, go to Apps > SAML Apps
- Click on Add App > Add custom SAML app
- Enter a name for the app (e.g. Amazon Business) and click Continue
- Download the IdP (identity provider) metadata file. The IdP metadata file contains all of the information in Option 2 and it is all available in plan text after the initial setup.
- Click Continue
Switch to Amazon
- Sign into Amazon Business using an administrator account
- Hover over the "Hello,
" towards the top of the screen and click on System Integrations - Click Setup under Single Sign-On (SSO)
- Select Google gSuite from the dropdown (as of this post, Amazon is still using gSuite not Google Workspace)
- Click Next
- Select a default group and buying role for new users
- Upload your metadata file from Google (GoogleIDPMetadata.xml)
- The next page will confirm the details from the metadata file. Click Next
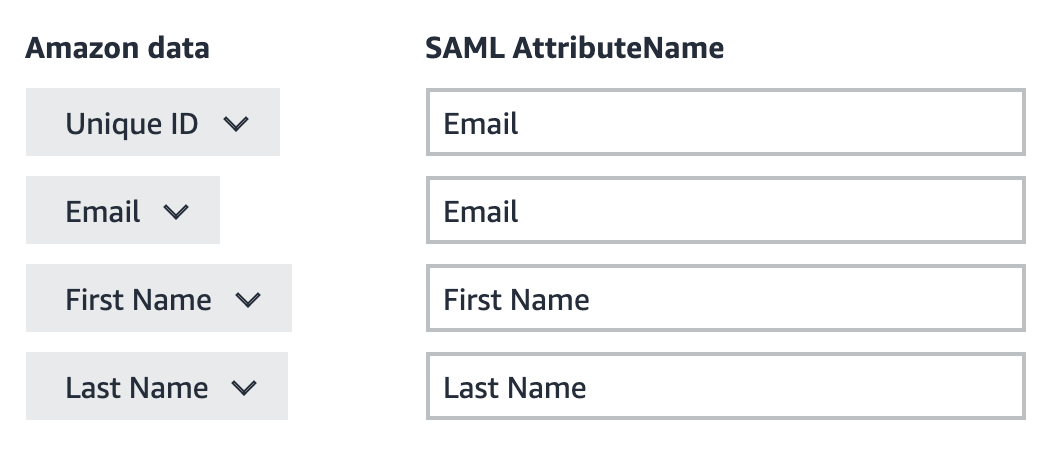
- Set the attribute mapping to match the screenshot. Click the "Add a field" link above the next button to add additional fields.
- The attributes should be mapped as follows:
- Click Next
Switch to Google
- We left off on the Service provider details page. Copy the SSO URL from Amazon and paste it into the ACS URL field. It should be: https://www.amazon.com/bb/feature/sso/action/3p_redirect
- Enter "https://www.amazon.com" into the Entity ID field in Google (without the quotation marks)
- Leave the Start URL field blank
- Leave the Signed response checkbox unchecked.
- In the Name ID section, set the Name ID format to EMAIL and the Name ID to Basic Information > Primary email
- Click continue
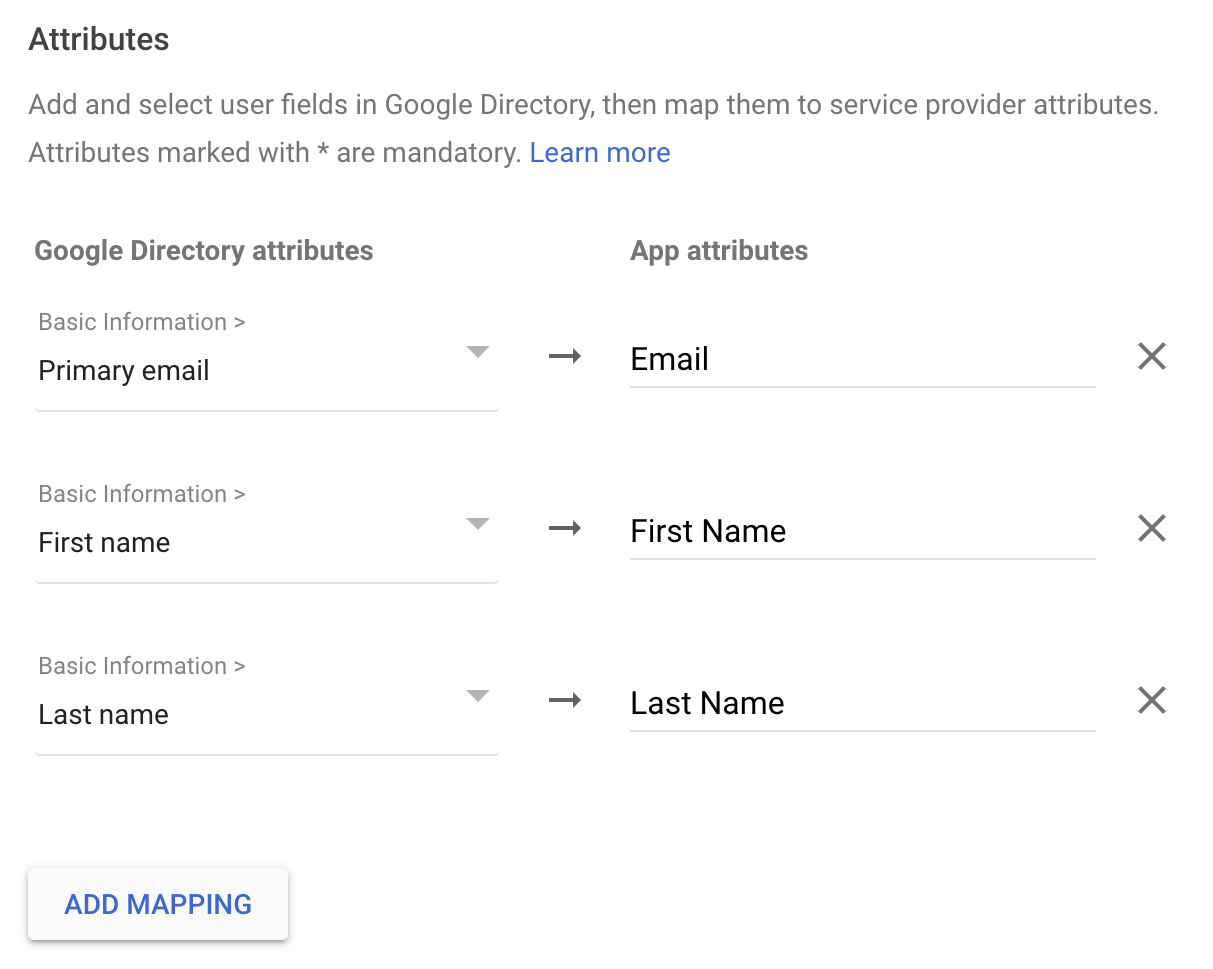
- On the Attributes screen, click ADD MAPPING three times
- In the first attribute, select Primary email from the dropdown on the left and type "Email" on the right.
- In the second attribute, select First name from the dropdown on the left and type "First Name" on the right.
- In the third attribute, select Last name from the dropdown on the left and type "Last Name" on the right.
- The attribute names are case sensitive, so double check and click finish
- Click on the User access section on the SAML app overview page
- Select "ON for everyone", turn on by organizational unit
- Click Save
- Click on the "Service status" header or "Amazon Business" in the top-left of the screen to go back to the overview page
Switch to Amazon
- Back on Amazon's website, check the "I confirm that Amazon's metadata has been configured on my IDP"
- Click the orange "start testing" button.
- If the test succeeds, click activate to complete the setup. Once you activate the connection, you will not be able to deactivate it or change SSO providers without contacting Amazon's customer service.
Google Settings
User Access
ON for everyone
*You can also turn it on for certain organization units only.
Service Provider details
ACS URL: https://www.amazon.com/bb/feature/sso/action/3p_redirect
Entity ID: https://www.amazon.com
Start URL: (blank)
Signed response: unchecked
Certificate: make sure that a certificate is selected
Name ID format: EMAIL
Name ID: Basic Information > Primary email
SAML attribute mapping
Basic Information > Primary email: Email
Basic Information > First name: First Name
Basic Information > Last name: Last Name
Amazon Settings
Certificate
The "Signing Certificate Public Key" should match your certificate in Google Workspace
New user account defaults
Choose the default group and role for new users.
Connection data
This should automatically populate from the Google metadata file. It should look something like:
EntityID: https://accounts.google.com/o/saml2?idpid=#########
Issuer: https://accounts.google.com/o/saml2?idpid=#########
HTTP-Redirect: https://accounts.google.com/o/saml2/idp?idpid=#########
HTTP-POST: https://accounts.google.com/o/saml2/idp?idpid=#########
Attribute mapping
Unique ID: Email
Email: Email
First Name: First Name
Last Name: Last Name
Amazon connection data
SSO URL: https://www.amazon.com/bb/feature/sso/action/3p_redirect